개인 Toy 프로젝트 - 논문 Reference Graph 생성기 with LLM
들어가며
이번에는 LLM을 가지고 작고 재밌는 개인 프로젝트를 해보려고 합니다. 바로 LlamaParse를 이용하여 논문의 Reference를 파싱하고, 파싱된 참조 논문들의 인용수 데이터를 가지고 그래프를 그려보는 것입니다!
- github : 🔗 kyeongchan92/recom_paper_crawling ↗
배경
자신에게 중요한 논문을 찾았는데, 이 연구의 줄기는 무엇일까 궁금할 때가 있습니다. 과거에 어떤 중요한 논문이 있는지 한 눈에 파악할 수 있다면 좋겠다고 생각했습니다. 더구나 요즘 LLM을 가지고 앱을 만드는 것은 쉬운 일이 됐고, Agent를 활용하면 복잡한 일도 시킬 수 있겠다는 생각이 들었습니다.
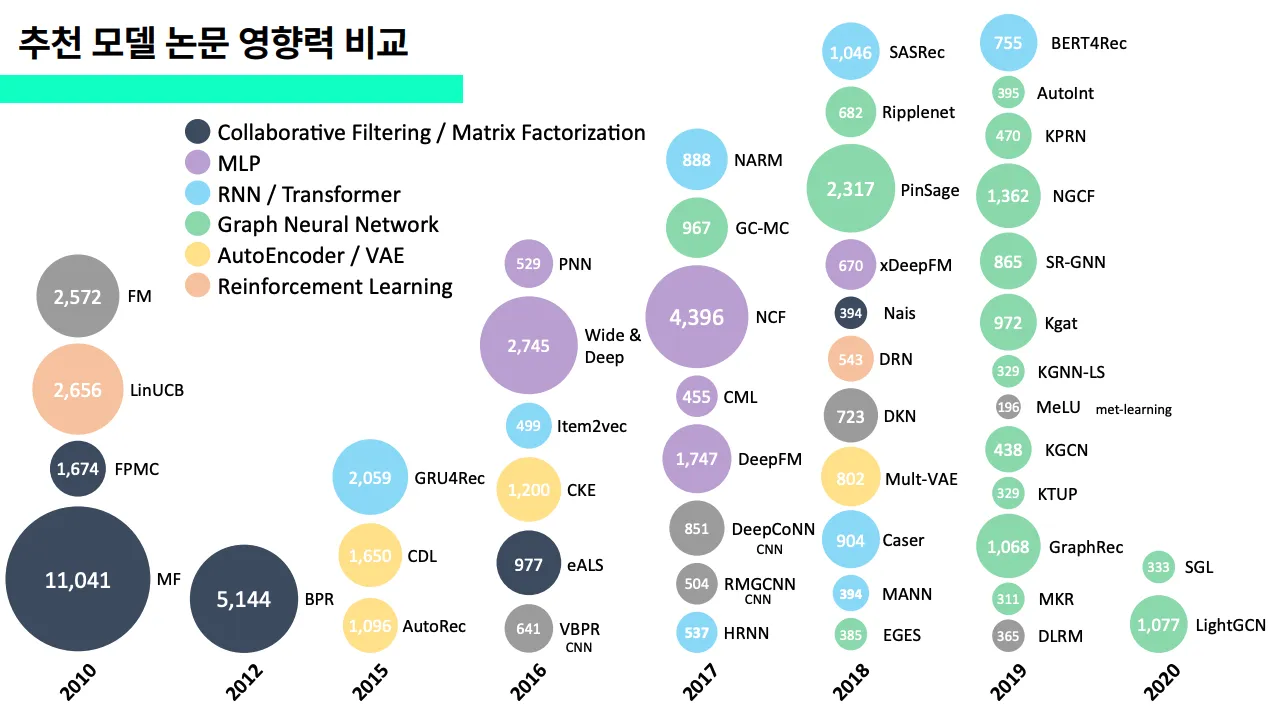
실은 지난 2023년에 있었던 6th 슈도콘에서 아래와 같은 장표를 만들어 발표한 적이 있었는데, 이를 자동화 할 수 있는 LLM Agent를 만들어, 직접 사용하면 좋겠다 생각했었습니다.
 DEVOCEAN 블로그 : [PseudoCon: 함께하는 성장 여행] 가짜연구소의 6번째 컨퍼런스 ↗
이 장표를 만들 때, 구글스칼라에 ‘Recommendation system’이라고 검색해서 나온 논문 중 인용수 300개 이상의 추천 모델을 다룬 논문만 직접 골라 정리했었는데요. 손수 하나하나 손으로 정리했기 때문에 시간이 오래걸렸는데, LLM이 이러한 트렌드 그래프를 자동으로 만들어줄 수 있지 않을까 생각했습니다! 중요하게 생각하는 것은 인용수입니다. 최근 5년 안에 인용수가 크게 증가한 논문은 학계에서 핵심적인 역할을 한 논문이잖아요~?
일단 결과물은 다음과 같습니다. 아직 완성은 아니고 계속 다듬어 나가서 이 사이트에도 배포해볼까 합니다!
- (테스트용으로 미리 띄워놓은 노드들이 있습니다) pdf 파일을 업로드합니다. 예시로 ‘MACRec’이라는 논문을 업로드해봅니다.
- ‘논문 파싱 시작’ 버튼을 누르면 Llamaparse는 내용을 파싱해서 벡터 DB에 저장합니다. RAG가 가능해집니다.
- ‘Reference 파싱 시작’ 버튼을 누르면 논문에서 Reference 부분을 추출하여 Google Scholar 기준 인용수를 검색하여 화면에 노드로 표시합니다.
일단 이번 달의 목표는 다음과 같이 잡고 작업했습니다.
- 논문 1개를 업로드하면 LlamaParse로 본문 내용을 파싱한다.
- 논문의 Reference를 추출한다.
논문명,저자,출처를 따로 추출한다. 예를 들면 아래와 같이 dictionary 형태로 추출한다. - 논문별로 구글스칼라의 인용수를 검색해서 수집한다.
- 그래프를 그린다.
{
    1 : {
        'title': 'Language models are few-shot learners',  # 논문명
        'authors': 'Tom Brown, Benjamin Mann, Nick Ryder, Melanie Subbiah, Jared D Kaplan, Prafulla Dhariwal, Arvind Neelakantan, Pranav Shyam, Girish Sastry, Amanda Askell, et al.',  # 저자들
        'source': 'Advances in neural information processing systems 33 (2020), 1877–1901'  # 출처
        },
    2 : {...},
    3 : {...},
}
1. 논문 1개를 업로드하면 LlamaParse로 본문 내용을 파싱한다.
from llama_parse import LlamaParse

documents = LlamaParse(result_type="markdown").load_data('./MACRec.pdf')
예를 들어 MACRec이라는 pdf 파일을 LlamaParse를 이용해 파싱하면, 결과는 다음과 같아집니다.

논문과 비교해보면, 형식은 차치하더라도 저자 정보같은 글자는 잘 가져오는 것 같습니다! 이렇게 파싱된 문장들을 벡터 DB에 넣어야 LLM으로 RAG를 할 수 있습니다. 저는 RAG + LlamaParse: Advanced PDF Parsing for Retrieval | by Ryan Siegler | KX Systems | Medium ↗ 사이트를 참고하여 KDB라는 무료 벡터DB를 사용했습니다. 아래는 참고 사이트에서 그대로 가져와 사용한 코드입니다.
import kdbai_client as kdbai
from llama_index.core.node_parser import MarkdownElementNodeParser
from llama_index.vector_stores.kdbai import KDBAIVectorStore
from llama_index.core import StorageContext
from llama_index.core import VectorStoreIndex

session = kdbai.Session(api_key=KDBAI_API_KEY, endpoint=KDBAI_ENDPOINT)
db = session.database("default")

schema = [
        dict(name="document_id", type="str"),
        dict(name="text", type="str"),
        dict(name="embeddings", type="float32s"),
    ]
indexFlat = {
        "name": "flat",
        "type": "flat",
        "column": "embeddings",
        "params": {'dims': 1536, 'metric': 'L2'},
    }

KDBAI_TABLE_NAME = "LlamaParse_Table"

try:
    db.table(KDBAI_TABLE_NAME).drop()
except kdbai.KDBAIException:
    pass

#Create the table
table = db.create_table(table=KDBAI_TABLE_NAME, schema=schema, indexes=[indexFlat])

node_parser = MarkdownElementNodeParser(llm=llm, num_workers=8).from_defaults()
nodes = node_parser.get_nodes_from_documents(documents)
base_nodes, objects = node_parser.get_nodes_and_objects(nodes)
vector_store = KDBAIVectorStore(table)
storage_context = StorageContext.from_defaults(vector_store=vector_store)

recursive_index = VectorStoreIndex(
    nodes= base_nodes + objects, storage_context=storage_context
)

table.query()
코드를 한줄 한줄 이해하진 못했지만 벡터DB의 조건을 설정해서 테이블을 생성하고, parser로 documents들을 KDB의 벡터DB에 삽입하는 과정이라는 건 알 수 있었습니다. 아무튼 table.query()의 결과로 볼 수 있는 것은 다음과 같습니다.
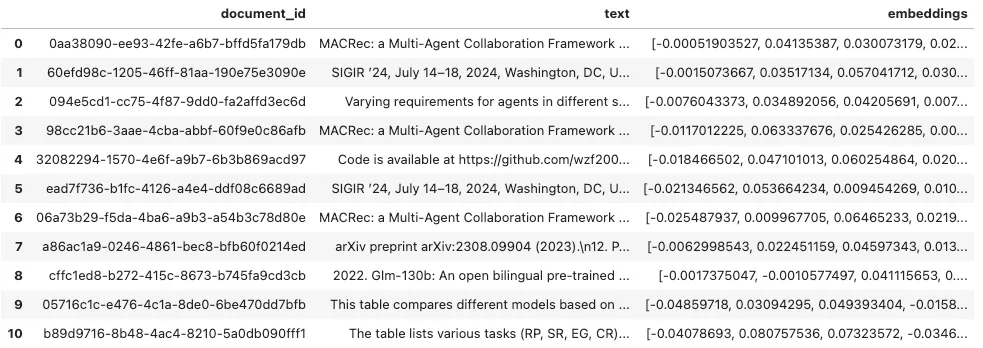
분리된 document별로 id가 생성되고, text와 embedding까지 생성된 것을 볼 수 있습니다. 이 상태에서 RAG가 가능합니다. 아래와 같은 프롬프트를 통해 논문의 Reference를 dictionary 형태로 추출할 수 있습니다.
2. 논문의 Reference를 추출한다.
from openai import OpenAI
client = OpenAI()

def embed_query(query):
    query_embedding = client.embeddings.create(
            input=query,
            model="text-embedding-3-small"
        )
    return query_embedding.data[0].embedding

def retrieve_data(query):
    query_embedding = embed_query(query)
    results = table.search(vectors={'flat':[query_embedding]},n=5,filter=[('<>','document_id','4a9551df-5dec-4410-90bb-43d17d722918')])
    retrieved_data_for_RAG = []
    for index, row in results[0].iterrows():
        retrieved_data_for_RAG.append(row['text'])
    return retrieved_data_for_RAG

def RAG(query):
    question = "You will answer this question based on the provided reference material: " + query
    messages = "Here is the provided context: " + "\n"
    results = retrieve_data(query)
    if results:
        for data in results:
            messages += data + "\n"
    response = client.chat.completions.create(
      model="gpt-4o",
      messages=[
          {"role": "system", "content": question},
          {
          "role": "user",
          "content": [
              {"type": "text", "text": messages},
          ],
          }
      ],
      # max_tokens=300,
    )
    content = response.choices[0].message.content
    return content

answer = RAG(f"""Find this paper's References. Give me that References with the given json form. Don't return any other comments except that References

EXAMPLE :
{{
    1 : {{
            "from_paper :
                            {{
                                "title" : "Language models are few-shot learners",
                                "authors" : "Tom Brown, Benjamin Mann, Nick Ryder, Melanie Subbiah, Jared D Kaplan, Prafulla Dhariwal, Arvind Neelakantan, Pranav Shyam, Girish Sastry, Amanda Askell, et al",
                                "source" : "Advances in neural information processing systems 33 (2020), 1877–1901",
                                "year" : 2020
                            }}
    }},
    2 : {{
        ...
    }},
    ...
}}
""")
위와 같은 few-shot 프롬프팅 코드를 실행시키면 아래와 같은 결과를 얻을 수 있습니다. Reference 부분을 불러와 dictionary 형태로 사용할 수 있습니다.
{
    1: {
        'from_paper': {
                        'title': 'Language models are few-shot learners',
                        'authors': 'Tom Brown, Benjamin Mann, Nick Ryder, Melanie Subbiah, Jared D Kaplan, Prafulla Dhariwal, Arvind Neelakantan, Pranav Shyam, Girish Sastry, Amanda Askell, et al.',
                        'source': 'Advances in neural information processing systems 33 (2020), 1877–1901',
                        'year': 2020
                       }
        },
   2: {
        'from_paper': {
                        'title': 'Trends in distributed artificial intelligence',
                        'authors': 'Brahim Chaib-Draa, Bernard Moulin, René Mandiau, and Patrick Millot',
                        'source': 'Artificial Intelligence Review 6 (1992), 35–66',
                        'year': 1992
                      }
      },
 3: {...},
 ...
}
from_paper 라는 key를 한 번 더 추가한 이유는, 뒤에서 Google scholar를 이용해 인용수를 검색할 때, 논문명과 저자명을 가지고 비교할 것이기 때문입니다. Google scholar에서 검색한 내용은 from_scholar로 삽입할 예정입니다. 즉, from_paper와 from_scholar의 비교가 필요합니다.
3. 논문별로 구글스칼라의 인용수를 검색해서 수집
scholarly라는 라이브러리를 이용하면, 논문명으로 구글스칼라에서 검색하여 원하는 정보를 가져올 수 있습니다. 하지만 구글스칼라는 엄격하게 요청 제한이 걸려있어서 하루에 20~30개 요청만 해도 Max Try 에러가 뜨더라구요. 프록시 변경을 통해 해결할 수 있다고는 하지만, 아직 방법을 찾고 있습니다. 아무튼, 특정 논문의 인용수를 아래처럼 쉽게 가져올 수 있습니다.
from scholarly import scholarly
search_query = scholarly.search_pubs('Language models are few-shot learners')

for result in search_query:
    title = result['bib']['title']
    authors = result['bib']['author']
    venue = result['bib']['venue']
    pub_year = result['bib']['pub_year']
    num_citations = result['num_citations']

    print(f"title : {title}")
    print(f"title : {authors}")
    print(f"title : {venue}")
    print(f"title : {pub_year}")
    print(f"title : {num_citations}")
    print()
title : Language models are few-shot learners
authors : ['T Brown', 'B Mann', 'N Ryder']
venue : Advances in neural …
pub_year : 2020
num_citations : 39991

title : Language models are few-shot learners
authors : ['B Mann', 'N Ryder', 'M Subbiah', 'J Kaplan']
venue : arXiv preprint arXiv …
pub_year : 2020
num_citations : 194
‘Language models are few-shot learners’라는 논문을 검색하면 위와 같이 검색 결과를 깔끔하게 가져올 수 있습니다. 하지만 검색 결과가 두 개 이상 나올 때가 있습니다. 구글 스칼라에서 확인해보니 아래와 같습니다.
](../../../static/img/monthly_pseudorec_202501/kyeongchan/google scholar search result.png)
첫 번째 결과는 제가 찾는 논문인거고, 두 번째 검색결과는 ‘T Brown’이라는 사람만 빠진 PPT 자료입니다. 제목은 같지만 제가 원하는 논문은 첫 번째 결과인데요. 이를 LLM을 이용해 원하는 검색결과를 가져와야겠다고 생각했습니다. MACRec 논문에서 추출한 Reference 논문 정보와 scholarly 검색 결과들을 비교하면서 같은 논문을 가리키면 YES, 틀리면 NO를 반환하게 했습니다.
PAPER_COMPARE_PROMPT = """🔹 Task Instruction
Determine whether A paper and B paper refer to the same research work. If they do, respond with "YES"; otherwise, respond with "NO".

A paper title : {a_paper_title}
A paper authors : {a_paper_authors}
A paper source : {a_paper_source}

B paper title : {b_paper_title}
B paper authors : {b_paper_authors}
B paper source : {b_paper_source}"""
실제로는 태스크 설명과 A, B 논문 리스트 사이에 더 많은 프롬프트가 들어갑니다. 처음엔 이렇게 간단히 했었는데, 같은 논문인데도 제목의 큰따옴표(”)와 작은따옴표(’)만 달라도 다른 논문이라고 반환하더군요! 그래서 수정을 여러번 했습니다.
scholarly에서 검색했을 때 검색결과가 없을 때도 있었습니다. 그럴 때마다 requests로 Google scholar에 요청보내서 검색하면 사용하면 검색이 될 때도 있더라구요~? 그래서 scholarly로 인용수가 찾아지지 않으면 requests로 인용수를 검색하도록 했습니다.
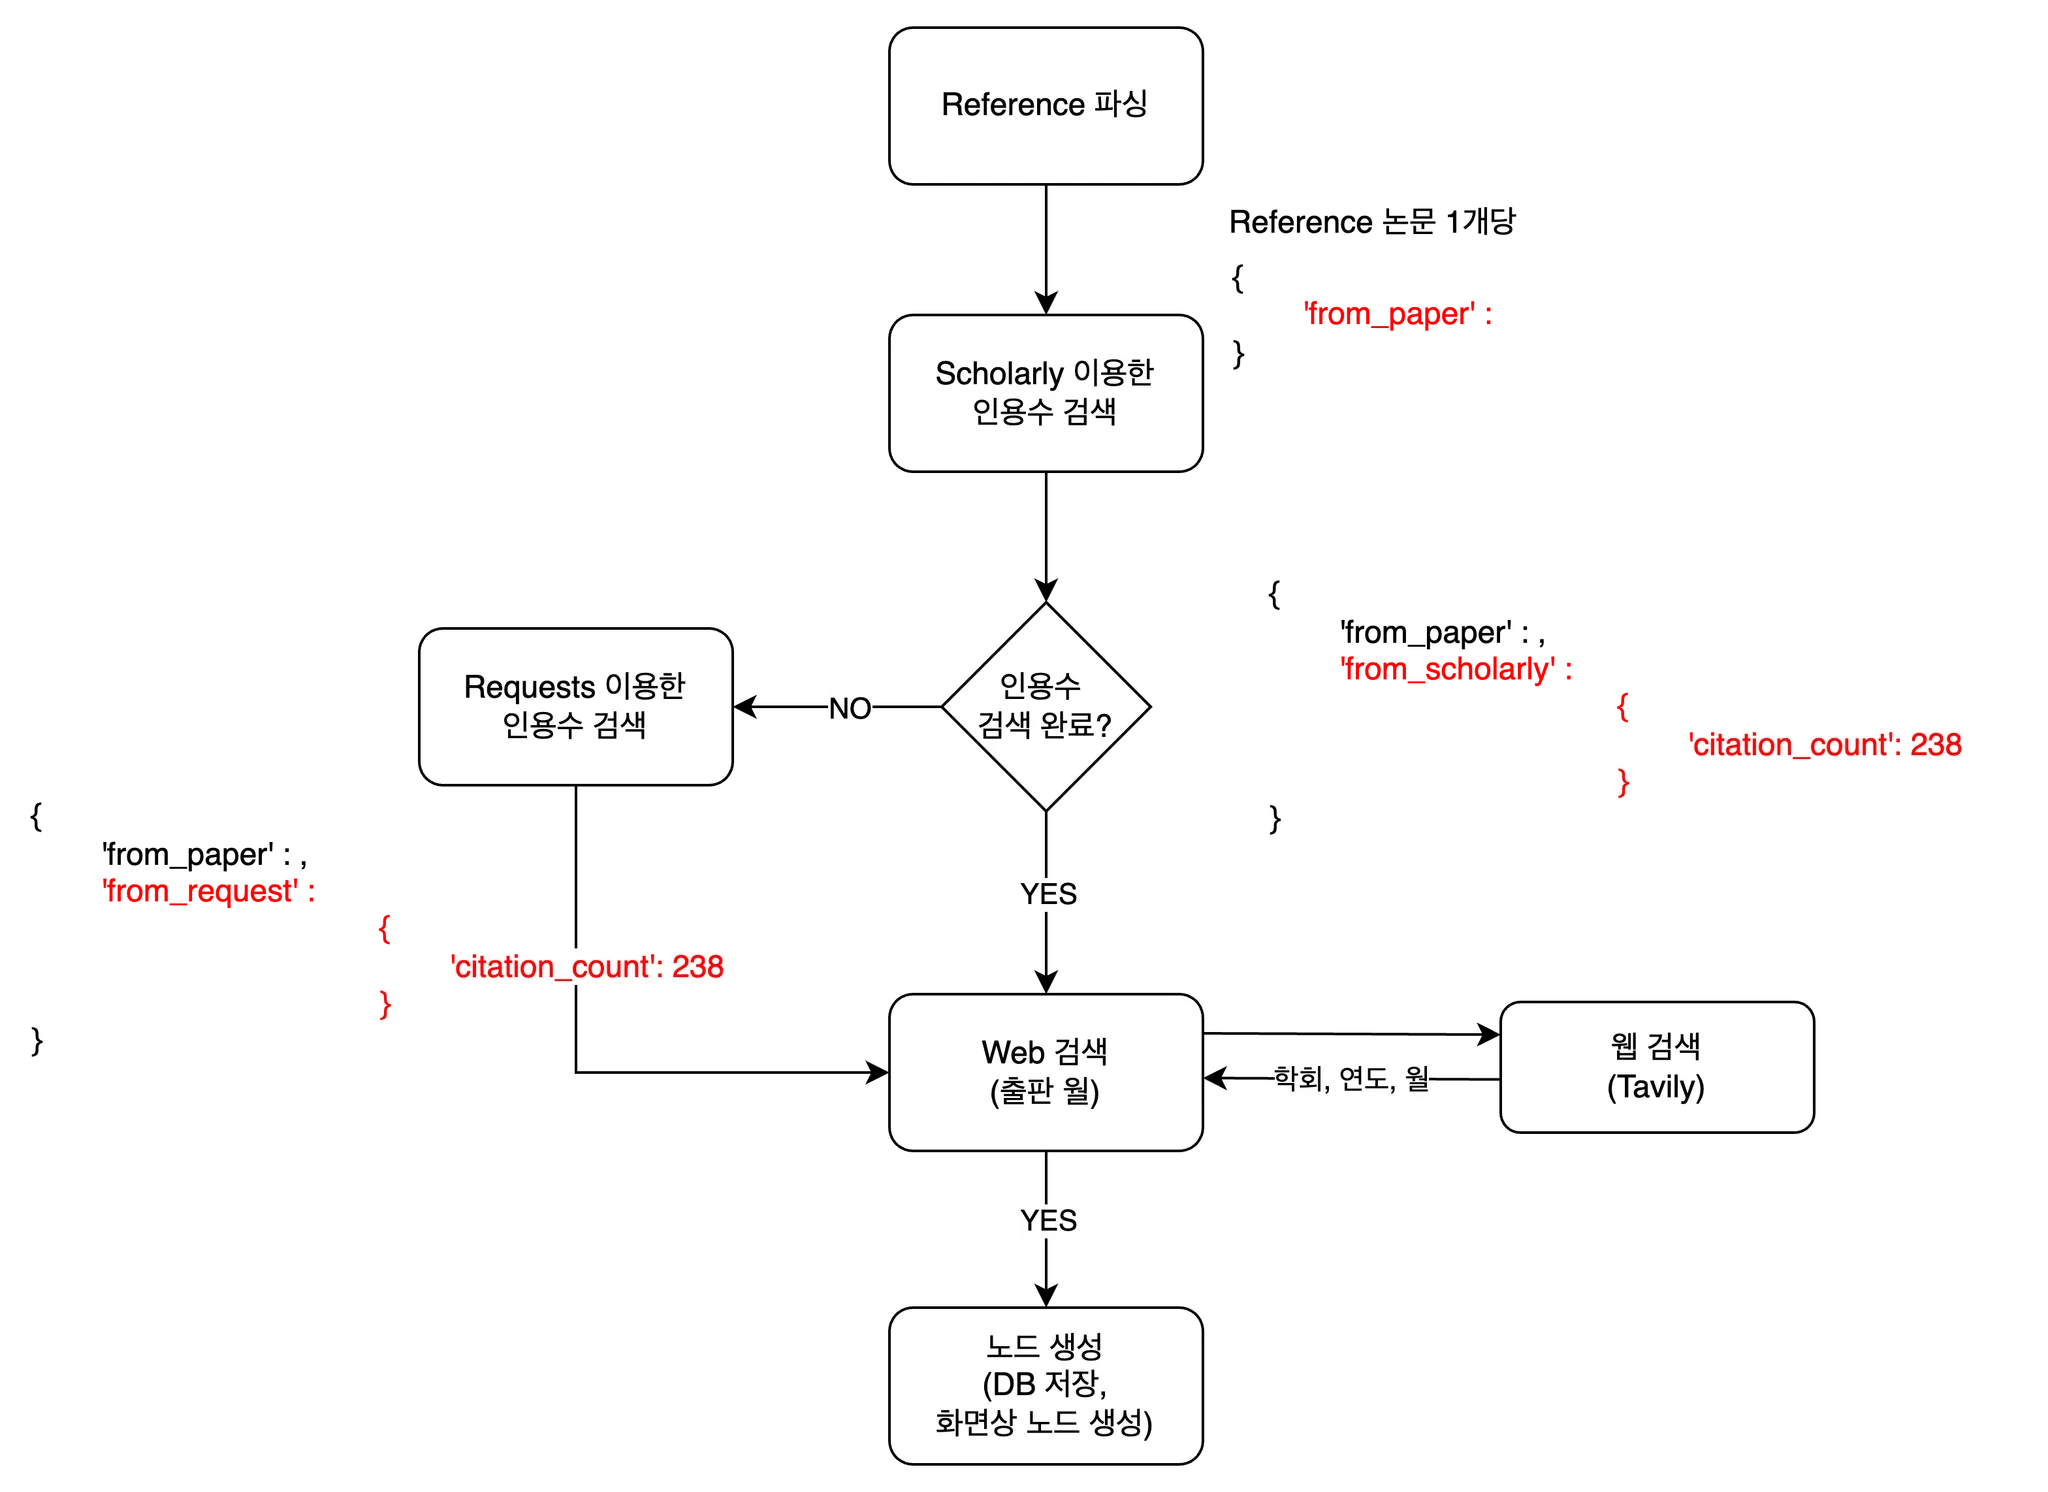
논문의 출판월까지 수집할 수 있으면 논문 노드 정렬을 예쁘게 할 수 있을 것 같아서 Tavily를 이용한 학회 & 출판연월 검색까지 구현해놓았지만, 다음 월호에서 다뤄보려고 합니다!
4. 그래프를 그린다.
마지막으로 Django와 javascript를 이용하여 브라우저에 논문 노드를 생성해주었습니다. 결과물은 위에서 보여드렸었죠~? D3.js라는 라이브러리를 이용하여 interactive하게 드래그할 수 있도록 했습니다. 확실히 논문 인용수를 이용해 영향력을 볼 수 있으니 어떤 논문이 중요한지 한 눈에 들어왔습니다. 앞으로는 연도/월별 정렬 기능을 넣을 예정입니다. 그리고 Neo4j에 이 논문들을 추가하여 관리하고, Reference에 있는 논문들로 다시 검색할 수 있도록 할 예정입니다. 그러면 특정 논문이 어떤 흐름을 갖는지 잘 볼 수 있을 것 같아요!
저만의 작은 월간슈도렉 Toy 프로젝트인데 앞으로 Agent를 적용해볼 수도 있을 것 같습니다. 이 프로젝트 결과물을 이용해 앞으로 제 자신이 논문 검색을 편하게 할 수 있었으면 좋겠네요😄 감사합니다!